Step By Step Guide On Proper Split Testing In Google Ads
Split testing is an important part of perfecting any advertising campaign. Whatever metrics you’re tracking – whether they’re clicks, click-through rates, leads, purchases, etc. – enough testing will help you find the right combination of factors to spend every dollar efficiently.
A lot of people think testing in Google ads – or any platform at that – consists of just making a separate campaign, ad group, or ad with the changes they want to test. It’s not that simple.
You have to use the split testing options that Google provides properly to ensure that the system tests both sides equally and independently from each other.

What Is a Split Test?
Before we get into the proper ways to split test on Google Ads, it’s important to know what a split test actually is.
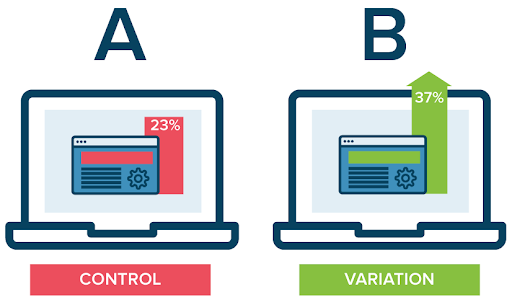
A split test – also known as an A/B test – is a method online advertisers and website specialists use to optimize their ads and pages for better metrics. The whole idea is to independently test different facets of an ad/web page to see if you can move the needle in the right direction.
You can test anything from headlines to descriptions to landing pages to CTAs to bid limits and more. Nothing is off limits and virtually anything can make a difference.
In testing, it’s important to put your preconceptions to the side and let the data show you what works.
The Importance of Proper Testing
When testing in Google Ads, you want to make sure you use the proper tools Google provides instead of just simply duplicating a campaign and making changes.
There are a ton of problems with simply duplicating an ad and making changes to test.
- Budgets
Unless you’re planning on doubling your budget for a test, you’re going to need to cut your budget for a test campaign. Hundreds of thousands, if not millions of advertisers on Google don’t spend nearly enough to be able to do this, leading to ineffective results for not just the test campaign, but the original campaign as well.
For example, say an advertiser is spending $32 per day (roughly $1000 per month) on Google Ads. This advertiser wants to test a new location for 2 weeks to see how it performs. They duplicate their original campaign, changing only the location and splitting $32/day between the 2 campaigns ($16/day each).
With a new budget of $16/day, Google kicks these campaigns into “Eligible (Limited due to budget)” and now neither campaign is getting enough impressions to produce effective results.
By doing this the advertiser didn’t just fail the split test, but they negatively impacted the original campaign that had been producing results as well.
- Learning mode
The minimum time an advertiser needs to see reliable results from a split test is around two weeks. Two weeks is NOT enough time for a brand new campaign – even if it’s been duplicated – to get out of Google’s “learning” mode and properly optimize.
When making a new campaign, Google usually doesn’t look at data from another campaign’s performance because it thinks the new campaign is going after a completely different audience or contains a completely different offer.
When you run a proper split test, Google knows that the core parts of the campaign are the same with some differences so it takes everything the system has learned from the original campaign to run the split test instead.
This can save you months of time from Google’s machine learning phase and immediately leads to more reliable test results.
- Google optimizes towards what’s working
Google’s goal is to get any campaign to the bid strategy chosen for that campaign.
For max clicks, the goal is to get the maximum amount of clicks on ads in that campaign. For target CPA, the goal is to get an acquisition (lead, purchase) at a given cost every time. You get the idea.
As long as Google is hitting these goals, it’s not going to change the ads or keywords it shows even if you’ve provided it with more options. A common mistake new advertisers make is thinking that Google rotates through ads and ad groups evenly.
Say you wanted to test an expanded text ad within an ad group. Even when you activate it, Google is going to slowly bring it into the rotation because the other ad is more reliable and has results to show for it. Google will likely spend most of the money towards the original ad(s).
This makes testing difficult since it doesn’t give the ad or keywords you want to test an equal split of the impressions. Any data that you want to evaluate at the end of the test – like conversions, CPL, CTR, CPC, etc. – would more or less be unreliable.
With a proper Google Ads split test, you can make sure the test ad or keyword is shown 50% of the time by assigning it a 50% split of the budget.
Getting Started
The first step to split testing in Google Ads is actually knowing what you want to test. This is super important. What you want to test tells you where you need to go.
Is it ad copy or landing pages? Or is it bids, keywords, demographics, or locations?
If your test has anything to do with the ad itself (e.g. headlines, descriptions, URLs), then you’ll need to do what Google calls an “Ad Variation” test.
You can see how to do a proper “Ad Variation” test in the section below.
If your test revolves around the campaign and its settings (bid strategies, ad groups, keywords, audiences, demographics, locations, etc.), then you’ll need to do a campaign experiment.
There’s step by step instructions on how to do this in the section of this post titled “Campaign Drafts & Experiments”.
Ad Variations
When a/b testing parts of the ad itself like headlines, descriptions, URLs, etc., you’ll want to do an ad variation test.
There’s 2 ways you can go about a/b testing ads with ad variations. You can either go through the ads page itself, or through the “Drafts & Experiments” tab on the left sidebar in Google Ads.
First Method (Ads page)
- In Google Ads, go to the account you want to make changes in (if you have multiple accounts you manage) and on the top click “All Campaigns”
- Click on the campaign the test will run in. If there are multiple campaigns you’re testing, you’ll want to repeat these steps for the other campaigns
- Once you’re in the campaign, click “Ads & Extensions” on the left sidebar then click “Ads” under that
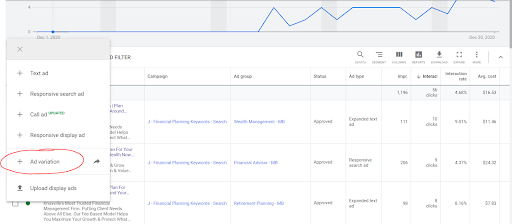
- In the Ads page, click the + sign to make a new ad and click “Ad Variation” at the bottom of the list
- You’ll be taken to the Ad Variation page where you’ll have to again select the campaign and the ad type (responsive or text) and click continue
- Choose “Find and Replace” in the next section and then put the old headline, description, URL, etc. in the “Find text” section
- Make sure to match the text with the part of the ad it goes with in the “In” dropdown section to the right
- Under that in the “Replace with” section, paste the text or URL you want to test and click continue
- Name the variation, set the dates (recommended 2 weeks minimum), and keep the “Experiment split” at 50%
- Click “Create Variation” when you’re done. You’ll see the ad variations on the same page where you can check back in to analyze the key metrics
Second Method (Drafts & Experiments page)
- In Google Ads, go to the account you want to make changes in (if you have multiple accounts you manage) and on the top click “All Campaigns”
- On the left sidebar, scroll down to the bottom and click “+More”
- On that same left sidebar, click “Drafts & experiments”
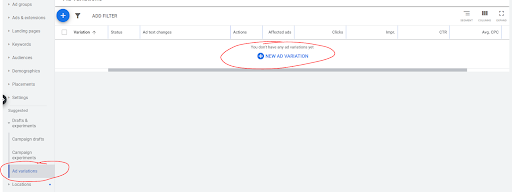
- Under that, click “Ad variations”
- You’ll be taken to the Ad variations page. Click the + button at the top or the “New Ad Variation” button in the middle
- Select the campaign you want to make changes in and the ad type (responsive or text) and click continue
- Choose “Find and Replace” in the next section and then put the old headline, description, URL, etc. in the “Find text” section
- Make sure to match the text with the part of the ad it goes with in the “In” dropdown section to the right
- Under that in the “Replace with” section, paste the text or URL you want to test and click continue
- Name the variation, set the dates (recommended 2 weeks minimum), and keep the “Experiment split” at 50%
- Click “Create Variation” when you’re done. You’ll see the ad variations on the same page where you can check back in to analyze the key metrics
Campaign Drafts & Experiments
When a/b testing parts of the campaign not involving the ad itself like keywords, bids, audiences, demographics, locations, etc., you’ll want to do a campaign experiment.
There’s two processes that go into creating a campaign experiment. First, creating a campaign draft then turning that draft into an experiment.
Campaign Drafts
- In Google Ads, go to the account you want to make changes in (if you have multiple accounts you manage) and on the top click “All Campaigns”
- On the left sidebar, scroll down to the bottom and click “+More”
- On that same left sidebar, click “Drafts & experiments”
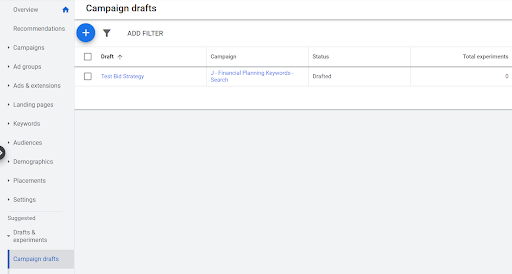
- Under that, click “Campaign drafts”
- You’ll be taken to the “Campaign drafts” page. Click the + button at the top or the “New Draft” button in the middle
- Press “Select a campaign” and choose the campaign you want to make changes to. If you have multiple campaigns you want to test, you’ll need to repeat these steps for those
- Name your draft with what you’re testing and click “Save”
- At the top next to “All Campaigns”, you’ll see that you’re currently in the campaign draft that you just made.
- Now you can go make the changes you want to test (keywords, bid strategies, targeting options, etc.) and save
Campaign Experiments
- Go to the left sidebar once again and click “Drafts & experiments”
- Under that, click “Campaign experiments”
- Click the + button at the top or the “New Experiment” button in the middle
- Select the draft you just made and name the experiment (usually the same as the draft)
- Set start and end dates (try to test for a minimum of 2 weeks) and keep the experiment split at 50%
- Click “Save” and you’ll be taken back to the “Campaign experiments” page where you’ll see the experiment being created
- Once the experiment is created, you can go to “All Campaigns” at the top and you’ll see the experiment listed on the campaign list with a beaker icon
- This is where you’ll be able to see the KPIs that your campaign has gathered
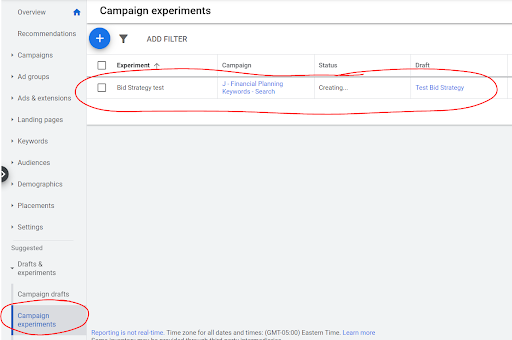
When stopping the experiment (if no end date), you can just click the beaker icon on the campaigns page and click the pause icon. If you want to delete the experiment entirely, go to the “Campaign experiments” page, select the experiment, then click “Remove”.
Evaluating Results
When evaluating results, you should keep a couple things in mind that will help you get the most information out of the split test you’re performing.
Give any test you run at least 2 weeks, preferably 3, before making a decision to act on the results. This ensures the test has enough time to build impression share and clicks to measure valuable results from. Any less than this can lead to skewed data.
Once your test is complete, you need to analyze the KPIs to determine whether the test led to better overall results or not. This all depends on what goal you have for these campaigns.
If your goal is to get more leads or sales, you should be looking at overall conversions, cost per conversion, conversion rate and conversion value. If your goal is to get traffic to your website, you should look at total clicks, click-through rate, and cost per click.
Every result from the split test should be compared to the original campaign. Once you’ve determined the results of the test compared to the original, you can decide on the next steps to take.
If the results from the test outperformed the original campaign, you should update the original campaign with the changes from the test. If the results didn’t outperform or do as well as the original campaign, don’t make any changes to your original campaign.
From here you can continue to test more parts of your campaigns to continue to optimize. Make sure that you’re only changing one variable at a time.